Showing posts with label html. Show all posts

HTML: Navigation bar


by Elizabeth, Delightfully Tacky and Tieka, Selective Potential

Having a navigation bar on your blog is really important. It allows your readers to quickly and easily access your most pertinent information and content. You don't want to make your readers spend more than a few seconds looking for a link to something important on your blog. How easy a website is to navigate often shows how well designed it is. Make your information easy to locate for your readers! There are several ways to create a navigation bar, so follow along for a couple of tutorials.

Elizabeth:
Right now on my blog, my nav bar has links to my About/FAQ page, all my Winnebago Journey posts, all my outfit posts, and my contact information. I'll probably be adding another one soon linking to my blog designer profile, so that people interested in having me makeover their blog design can easily find that information as well.

(This session is going to tell you how to do it in Blogger. If you have Wordpress or another platform, I have no clue how you'd go about doing it. But I will say that in pretty much all cases, when it comes to figuring out HTML, Googling it is your best bet.)

Here are two ways to go about putting a horizontal navigation bar on your blog:

1. Adding a place to "add a gadget" TO your header

Step 1: Go to Dashboard > Design > Edit HTML.

Step 2: Back up your template.

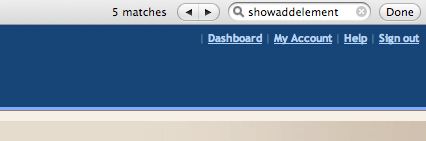
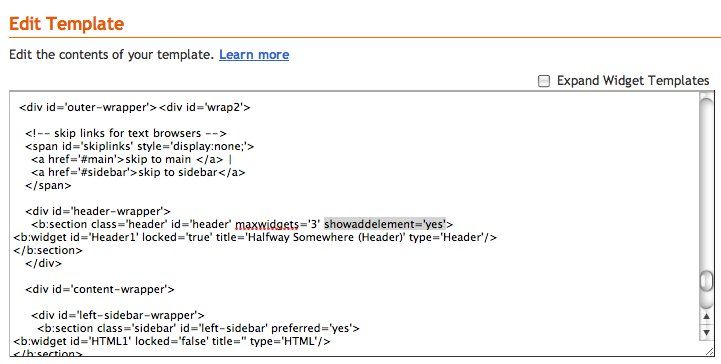
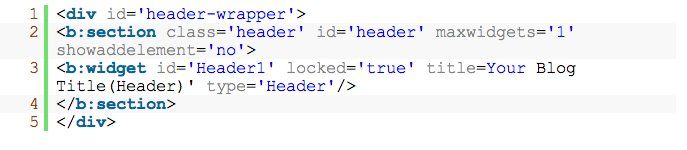
Step 3: Add an extra "Add a gadget" in the HTML for the blog Header. This involves the simple step of finding and editing showaddelement='no' to showaddelement='yes' in the template.

On my Mac I just do command-f to drop down the little search bar and type in "showaddelement" and it shows me where that text is on the page (not sure how to do that if you aren't using a mac/safari). You want to find the instance within the Header section and change that from 'no' to 'yes'.
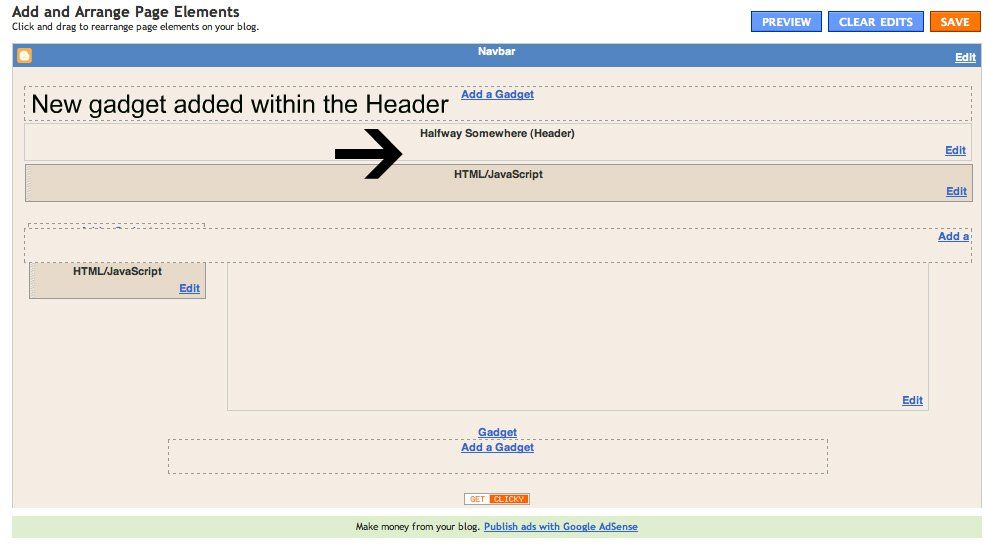
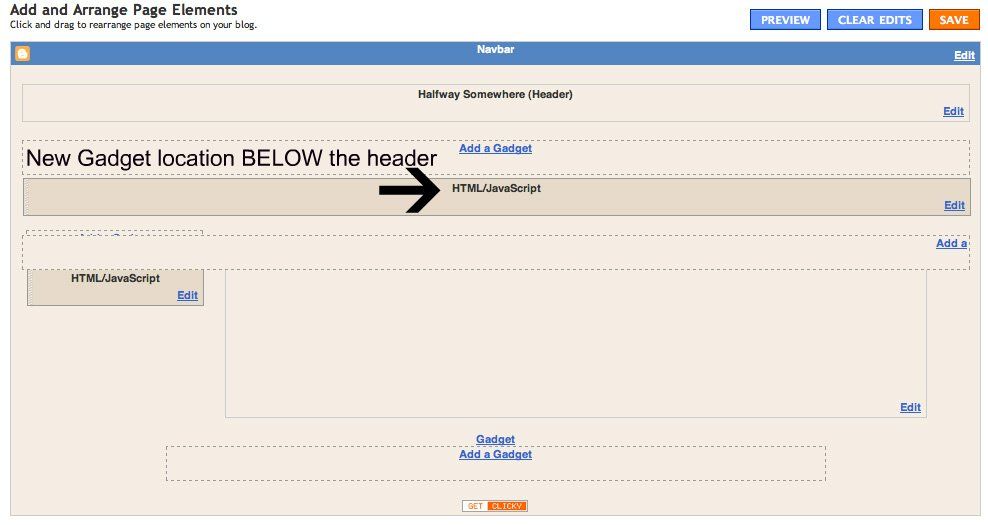
Step 2: Go to page elements, click ADD A GADGET in the blog Header section and choose an HTML/Javascript gadget. You can either have the gadget above or below your header, just drag it above or below and then drop it to place it (like how you would arrange your sidebar gadgets).

Step 4: Type in this HTML, with any number of links you wish:
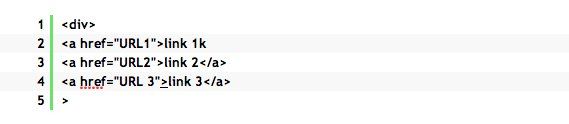
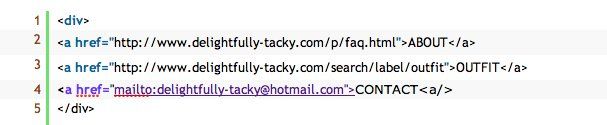
where you should change the URL and the "Link 1" to any text that describe the page you want to link to like HOME, ABOUT US, etc. For example:


However, I've used images instead of text for my buttons. To do this, you'll need to create the images that your nav bar buttons are going to be, upload those to a photohosting site like flickr or photobucket, and then use this kind of code in your HTML gadget:
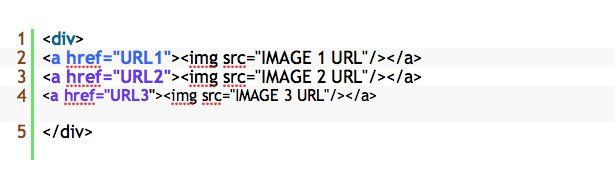

So instead of text, your buttons are images. I like this because it allows for greater customization than just the plain text links.


2. Adding a new place to "Add A Gadget" BELOW your header

This time instead of just adding an HTML widget to your header, we're actually creating a whole new location to add widgets to, below your header.

1. Go to Dashboard > Design > Edit HTML.

2. Back up your template.

3. Look for the following lines (or something similar) in your HTML code:


Right under it, paste this code:
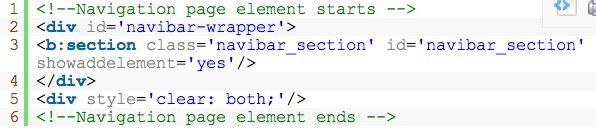

4. Now go back to "page elements" and you'll find a new place to add a gadget, right below your header. Click, "add a gadget," choose the HTML gadget and follow step 4 from the first example to add your links into the new Nav Bar!


If you're wondering how to link to all of your outfit posts, or all of your recipe posts, etc., you can do that using labels. You can label each post with a relevant label (there's a little box below the post as you're composing it where you can type in "labels for this post"), and then when you publish the post, right below it will be some hyperlinked text, like so:


If you click on one of those links, say "outfit", it will take you to a link that shows every post with that same label. In this case, it will show you all of my outfit posts: http://www.delightfully-tacky.com/search/label/outfit. So that's the URL I use for my "OUTFITS" button. It takes you to every post that I've labeled "outfit." My "BRAVE" nav bar button is the same kind of button, linking to all posts labeled "brave journey."

There you go! And remember: Always make sure to save a backup of your template before you start messing around with the HTML of your blog.

Tieka:

When I first started blogging, I used to have my navigation in my sidebar! I used images to link up pages and tags like, "About me", "outfits", etc. But once I decided I wanted to use my sidebar space more wisely, I decided to create a top navigation bar. It's great because it's so easy to find, it's the first place readers will look for buttons and it now is part of my design. You can have your navigation anywhere though (sidebar, top menu, bottom menu) just make sure that readers can find it easily.

For my tutorial, I use Blogger. In Wordpress, you'll have to create a menu system.

Using Blogger, in the "Design" tab, you can click to add a gadget. Be sure to select the HTML/Javascript gadget. Then, you can click and drag your gadgets around your blog. You can add it into the sidebars or you can drag it below the header. Once you have your HTML/Javascript gadget placed, let's dive into the HTML coding.

Use picture links to create a navigation bar!

What I do is create a picture link to link up all of my picture buttons to my links or tags. You can create your buttons using Photoshop or whatever program you use to edit your photos. Just make sure they are all the same height, otherwise your buttons will look all over the place. You can use images, text or little graphics for buttons - whatever you choose, just make sure that your buttons are clean and readable.

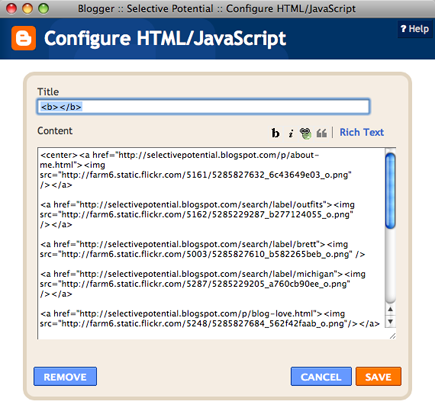
To create a picture link, use this HTML code:


You will have to figure out the links for your pages or posts and for your tags. To figure out the link of a page you created (like about me), click on the page and copy the web URL in your browser. You can do the same with your image address. Once you have your page/post/tag link and your image URL, you can insert them into the code. Wala, you've successfully linked up your button to your link!


Use the pages gadget in Blogger.

Another easy way of creating a top navigation bar in Blogger is to create a "Pages" gadget. You can go into your "Design" tab, click on "New gadget" and click on "Pages". This will only link up the pages you've created in Blogger though (like about me, contact, blog favorites). But it will not link up tags like (outfits, travel, friends, etc.). So if you are only looking to create a nav bar with your pages, then this gadget would be a good fit for you! But if you are looking to link up outfits or other "tags", you'll have to do a little bit of HTML work!


Pin It!

HTML: Uploading photos


I get asked this question a lot. How do you get such clear, crisp photos? In this session, I will be going into more detail about making sure you keep your photos crisp and clear without bogging down your reader's computer, information on where to host photos, how to upload photos and the some tips on the best photo storage online.

First, I'd like to talk about the pre-uploading things you need to be doing to keep your photos crisp and clear.

1. Camera: It's obvious that photo quality is greatly contributed to a camera. If you are snapping your photos with the smallest size setting on a little point and shoot, you might not get the best quality. I personally invested in the cheapest DSLR I could find... and I shoot my images on the "large" setting instead of the "small or extra large". I don't need to blow my images up into a poster, but I also want a nice clear photo on the blog.

2. Editing: During the editing process, if you are saving your photos out using Photoshop or another photo editing program, make sure you are saving your photos at 72 DPI. (DPI means dots per inch). For a screen, you only need 72 DPI. If you are saving your photos out at 300 DPI (which is more accurate for print instead of digital) you are going to bog down your reader's computers with slow loading time.

3. Image size: I could recommend figuring out the pixels of your blog post area. I know mine by heart because I use it constantly when working with my images. (435 pixels, exactly!) If you know the pixels of your blog post area, you can resize your images accordingly to fit right into that space. I would recommend saving smaller images into your blog. FYI: If I'm viewing a blog for the first time and the images take longer than 15 seconds to load, I'm gone. So, this is very important! If you still want to have high-res images available, upload them to your photo hosting site along with the smaller images for your blog and link them on your blog!

4. Hosting: Where you host your photos can contribute directly to the quality of the photo. I personally use Flickr. I purchase a $25 Pro account every year and it's the best $25 I spend on my blog. Flickr preserves photo quality amazingly, they have the best way to organize photos and it also serves as a great community! You can also host your images through Photobucket or even right through Blogger or your blog host. Note: Flickr is the best. Blogger is the worst.

5. Uploading images: Let me give you a terrible example of what you can do when you upload your image into your blog. You can upload your 4000 x 2000 pixel image directly into your blog without using an image host or resizing. You might think Blogger is resizing your image, but really it's just shrinking it, but keeping the file size there. It's nice because if you read a blog, click on the image and it will take you to a high-res version.. but really, not many people click on the high-res image or need it. But people will click off your blog if the images are taking too long to load. So take the pros with the cons and decide what's right for you, but I would recommend taking my advice. Resize your images for faster loading time.

Reader Question:: How do you get your images to line up in the blog posts exactly whether they are vertical or horizontal images?

Answer: Make sure that when you resize an image... you are saving ALL of your images with the same WIDTH pixel dimension. Height doesn't matter, but width is very important!

Adding an image to your blog post through another photo host:

To add the image to your blog if you are using Flickr or Photobucket, you can copy the "image address" of your photo, click on the little image button on Blogger or Wordpress and insert the image URL. If you click upload image, your image will appear. You can also choose the layout (left, middle right) and the image size. I always have large selected for image size (but I've already sized my image prior to uploading!) In blogger, you only get 1024 mb of space, so that's another great to reason to use a different photo-hosting site!


Pin It!

HTML: Adding sponsor spots & buttons


by Elizabeth, Delightfully Tacky

One thing you may want to know (if you don't already) is how to create buttons in your sidebar. What you're basically doing is just making an image clickable by adding a click-through link to the HTML code when you put the image in your sidebar. I'll be showing you how to do this in Blogger but the process should be similar in other platforms.

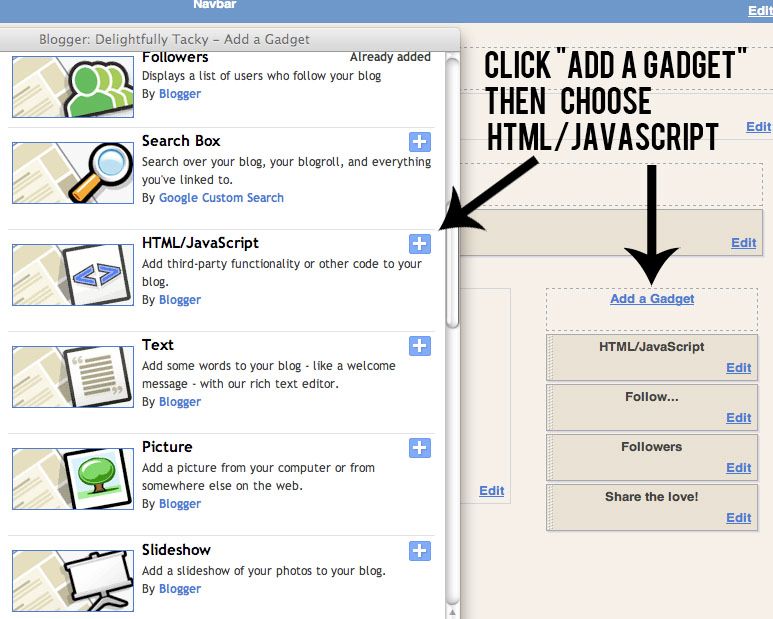
First, you'll need to add a new gadget in your sidebar. Click "add a gadget" and then choose "HTML/Javascript from the options available in the pop-up window.


Now you have a new gadget where you can put anything you want! We're going to insert a linked image, which can function as a link to something in your own blog (like your outfit posts, about me, etc.) or they can be sponsor ads!
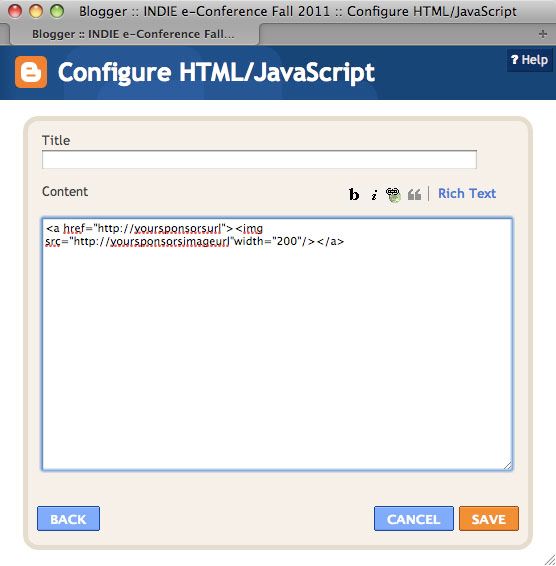
Use the HTML tags we learned earlier today to make a link and image that will click through to the link, like so:


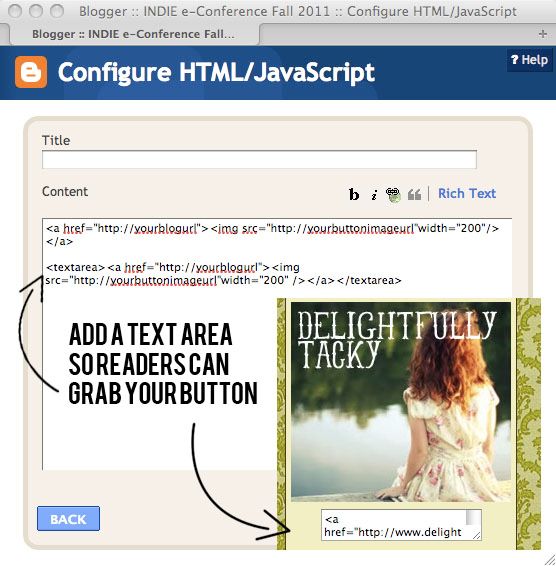
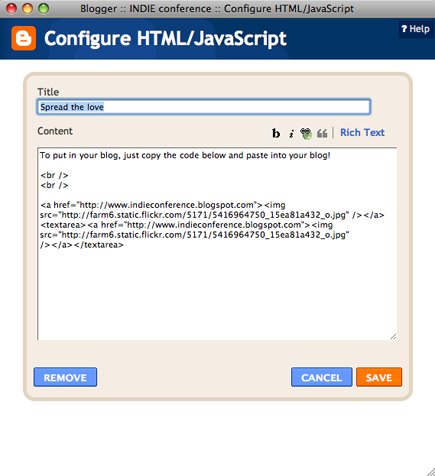
And then if you want to create a little text box underneath the photo so people can grab it and put it into their sidebar too, add the textarea code underneath with the code you want within the text box for people to grab, like so:


Here's what that looks like in the widget creator:


For all this, you'll want to know how wide your sidebars are, so you don't end up trying to put a 400px image in a 200px sidebar. The image will end up spilling over the edge of your sidebar and will look weird. You can either edit the image to be the exact width of your sidebar or you can add: width="220"  (inserting the width of your sidebar there, mine are 220px) and it'll make your photo that width.

If you're making buttons for readers to grab, you also might want to give some instructions on how they can place them in their sidebar, for those readers who aren't sure. On my blog I have written, "To put in your blog, just copy the code below and paste into an HTML widget in your blog!"

Do you have any buttons on your blog? Try it out! It's pretty fun!

Pin It!

HTML: Upload a template to your blog


This HTML tutorial will explain how to upload a pre-existing template to your blog. This idea is great if you are clueless on HTML, don't have the time to fully customize it or don't have the money to hire someone else. Pre-designed templates are a great starting point, but we wouldn't recommend sticking only to a pre-designed template. It doesn't contain your brand or your themes.. but you can choose a template that you really like and may represent you well. Plus, it holds up well as a starter template if you want to get started right away.

Note: This tutorial is for Blogspot users only. If you are looking to upload a template to your Wordpress blog, follow this link here for a quick tutorial. In Tumblr, you can choose a theme directly from their Theme Garden.

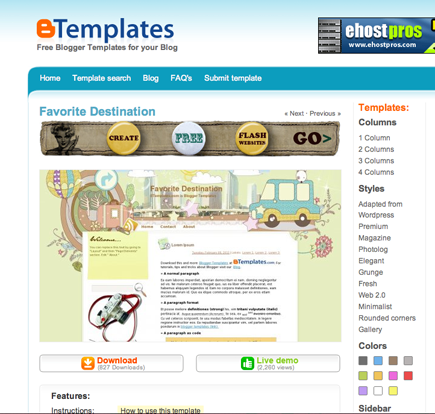
For blogger users, there are several websites where you can download free templates. When I first started blogging, I used BTemplates. You can search by number of columns, styles and color. Once you find a theme you like, go ahead and click on it. Click on the "download" button and it will automatically download the file to your computer.


Once you have the template downloaded to your compuer, it will be an .xml file. An .xml file is an extensible markup language file. Once you are logged into Blogger, you will need to click on your design tab. Then, click on the edit html tab.

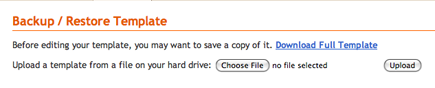
Note: It is very very important that you download a copy of your blog template before you do any changes or try to upload a new one. Just in case the template does not work well with your blog, you will want to make sure you have a back-up file. You can download your template by clicking the Download Full Template link. It will automatically download to your computer.

Next, if you are ready to upload your template, click on the "Choose file" button next to where it says Upload a template from a file on your hard drive: Once you select the .xml file you saved on your computer, click upload.


If you have already set up widgets and blog posts on your blog, it may be possible you will get some error messages saying you don't have certain widgets in the template you are trying to upload. If you want to keep the widgets you've already created on your blog, you will want to say "keep widgets" and you'll have to go back into your blog design area and clean up your widgets area.

Uploading a template is a quick and easy way to install a blog design, but keep in mind what you've learned with branding, incorporating theme and doing it yourself!


Pin It!

HTML: Adding Google Analytics


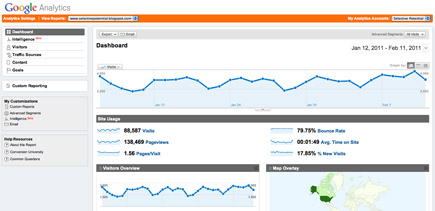
Google analytics will be an insanely helpful tool in helping you figure out stats like page views, unique visitors, traffic sources and so much more. It's important that you add Google analytics (or some stats tracking device) on your blog. This tutorial will be using Blogger to add Google Analytics, but it's very easy to install to Wordpress or Tumblr as well. Click on the links below to be taken straight to a Wordpress or Tumblr tutorial. Also, if you use Blogger, you can also use the new Stats tab. It is very easy to understand and navigate. I use it on a daily basis, but I also still use Google Analytics and check it frequently.

Get your Google Analytics Code

1. Log into Google Analytics at http://google.com/analytics.
2. Click on Add Website Profile. A form displays.
3. Select Add a Profile for a New Domain.
4. Enter the URL of your site or blog.
5. Select your country and time zone. Click finish.
6. Analytics provides you with a code block - a swatch of HTML - to add to your site's page.
7. Highlight the code block and then copy it right click > ctrl-c or command-c)


Add the Google Analytics Code to your Blogger Blog

1. Under your blog, click on the Design tab.
2. Click on Edit HTML. The big ol' editing screen for your blog template's HTML displays. Don't worry - it looks massive, but I'll walk you through it! Just scroll to the bottom.
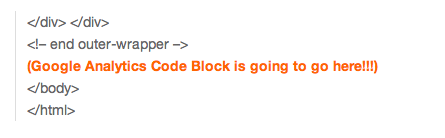
3. Look for the end of the template. It'll look like this:


4. Put your cursor right before that body tag.
5. Paste your Google Analytics code by right clicking > ctrl-v or command-v.
6. Click save changes.

You've added the Google Analytics Code to your blog!

Checking up on your work

1. To make sure you've successfully added the Google analytics code to your blog, go back to http://google.com/analytics.
2. Next to your blog's URL, it will say either Receiving Data (you were successful) or Tracking Not Installed (something is missing).
3. If it said Tracking Not Installed, click on Check Status. Google then checks your blog for the Analytics Code and reports back if it finds it or not.
4. If not, try re-pasting the code block in.

Note: You will not be able to see your stats right away on Google Analytics. It may take several days before it starts reporting back to you.


Helpful links:


Pin It!

HTML: HTML tags to know


by Elizabeth, Delightfully Tacky

HTML is a scary thing for a lot of people. All those weird characters and stuff that doesn't seem to make any sense at all... it's like trying to read a whole new language. Because most blogging platforms have made it easy to edit stuff without needing to get down to the nitty gritty HTML, you probably won't need to know a ton of HTML. However, there are some HTML tags that will probably come in handy for you to know!

The tag I use most (in every post, actually), is the image tag:
  • <img src="http://yourphotolink.com"width="600"/>
Here are some more great HMTL codes you might find yourself using!

Link code-
  • <a href="http://linktoyourblog.com"/>my blog!</a>
Image link code-
  • <a href="http://linktoyourblog.com"/><img src="http://yourphotolink.com"width="600"/></a>
Email code-
  • <a href="mailto:youremailaddy@email.com">contact me</a>
Breaks-
  • </br>
Bold text-
  • <b>text you want bold</b>
Italicized text-
  • <i>text you want in italics</i>
Strike through text-
  • <s>text you want in strike through</s>
Center-
  • <center>text or image you want centered</center>
You can also google pretty much any code you need to find. There are a ton of tutorials and online resources dedicated to helping people figure out the vast mystery world of HTML and coding, such as W3Schools.com and books like HTML for Dummies!

Pin It!

BONUS: Make a Favicon


By Elizabeth, Delightfully Tacky

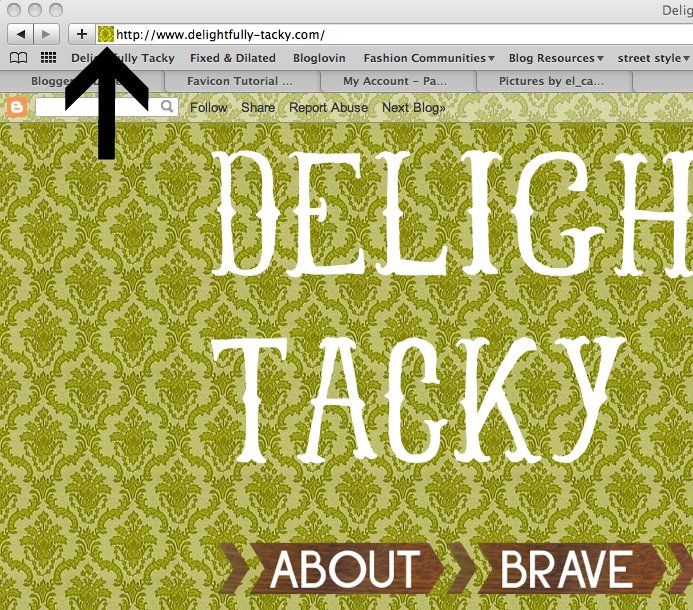
A favicon is that little 16 x 16 px, customized square next to the URL of a website. For blogger, it's their little "B" logo. For Google, it's their primary colored "G". I made my favicon from the background of my blog. While you don't need to make a favicon, it can certainly strengthen your branding, help people recognize your site, and they're just cute and fun! The tutorial I used to create my favicon is from Le Blog de Sushi, and it was so great that I've basically just recreated her tutorial, which you can find here. (note that all the html coding has an asterisk added, which you'll have to remove for it to work properly).


Here's how you do it:

1. Locate the <*/head> tag in your blog code and paste the following HTML before it:
<*link href='favicon.ico' rel='icon' type='image/ico'/>
<*link href='http://yoursite.com/image.ico' rel='shortcut icon'/>

2. Create a your new favicon image file that is 16x16 pixels in size. Photoshop is great for this, or you can probably use Picnik or Splashup to create it. After you've finished designing your icon, save it to your computer as a jpg, gif or png file.

3. Go to http://www.favicon.cc/? and click 'Import Image'. Use 'Browse' to find and select your favicon image, then click 'Upload'. Under the 'Preview' section of the page, click 'Download Favicon' and save a copy to your computer.

4. You will now need to find a place to host your icon. As ico files are not considered image files, hosting sites that only allow hosting of images (such as Flickr and Photobucket) won't allow you to upload the file. Instead, if you own a domain you can upload the favicon there. For those who don't, I'd suggest signing up with a free hosting site such as 000webhost.com, which allows you to upload via FTP or their file transfer page.

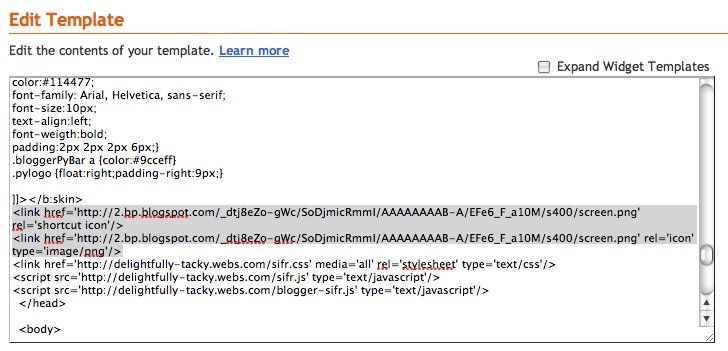
5. Once you've uploaded your favicon, go back to your blog's HTML code and replace the highlighted URL of the original code with your favicon's URL:
<*link href='favicon.ico' rel='icon' type='image/ico'/>
<*link href='http://yoursite.com/image.ico' rel='shortcut icon'/>

Here's what it looks like in my code:


Don't forget to remove the asterisks or the code won't work. Save and refresh your blog and you should now see your favicon in the address bar!

(disclaimer: I haven't actually made a favicon in a few years, so let me know if this tutorial is out of date or doesn't work and I'll fix it!)

Pin It!

HTML: Create a grab button


A grab button is a great promotional tool for you to feature in your sidebars! If you have readers that love and want to support your blog, most likely they'll grab one of your buttons and paste it on their blog. It increases traffic and basically can give you free advertising! It's also great to support blogs you love. If your readers see you support and like blogs that they like, they'll probably be more interested in reading about your blog! This session is a brief tutorial on how to create your own grab button using HTML!

First, you will need to create a button. Make sure that the width of your button fits into your sidebar. You might also want to create 1-2 buttons so readers can pick and choose their favorite and the button that best fits into their sidebar. Don't use anything too big (nothing bigger than 300 x 300 px) or anything too small (nothing smaller than 100 x 100 px). Be sure to include the name of your blog and your brand look and feel. You'll have to be creative in such a small space.

Once you have your button made, you will need to upload it with your photo hosting site and grab the image address of the button.

You can create widgets/gadgets in Blogger and Wordpress both, so you should easily be able to use this tutorial for both platforms.

For Blogpost users, you'll need to create a new gadget and select the HTML/Javascript gadget. For wordpress users, you'll need to create a new widget that is text you can insert HTML coding into.

Once your gadget or widget pops up, you will need to copy and paste some HTML code into the text area.

Two examples of grab buttons in two different sizes:


The HTML code you will need to place is:

The first part of this HTML code will link your button to your blog. The second part where it says text area will allow you create a text area box where people can grab the HTML code. The text area code I'm using is the same I'm using to create these boxes here!


It will look like this:

Now you know how to create your very own grab button using HTML coding!


Pin It!