
by Elizabeth, Delightfully Tacky and Tieka, Selective Potential
Having a navigation bar on your blog is really important. It allows your readers to quickly and easily access your most pertinent information and content. You don't want to make your readers spend more than a few seconds looking for a link to something important on your blog. How easy a website is to navigate often shows how well designed it is. Make your information easy to locate for your readers! There are several ways to create a navigation bar, so follow along for a couple of tutorials.
Elizabeth:
Right now on my blog, my nav bar has links to my About/FAQ page, all my Winnebago Journey posts, all my outfit posts, and my contact information. I'll probably be adding another one soon linking to my blog designer profile, so that people interested in having me makeover their blog design can easily find that information as well.
(This session is going to tell you how to do it in Blogger. If you have Wordpress or another platform, I have no clue how you'd go about doing it. But I will say that in pretty much all cases, when it comes to figuring out HTML, Googling it is your best bet.)
Here are two ways to go about putting a horizontal navigation bar on your blog:
Step 1: Go to Dashboard > Design > Edit HTML.
Step 2: Back up your template.
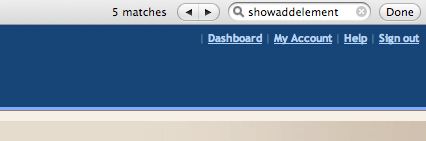
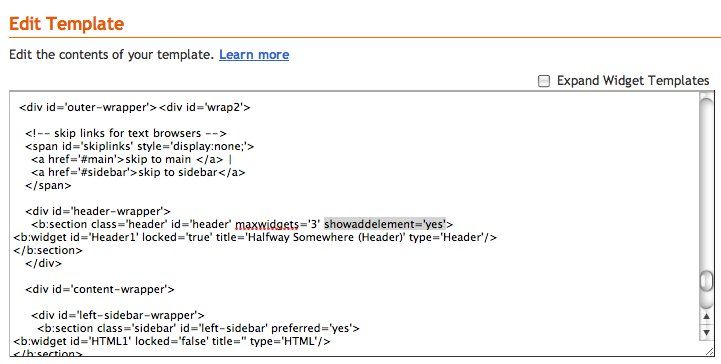
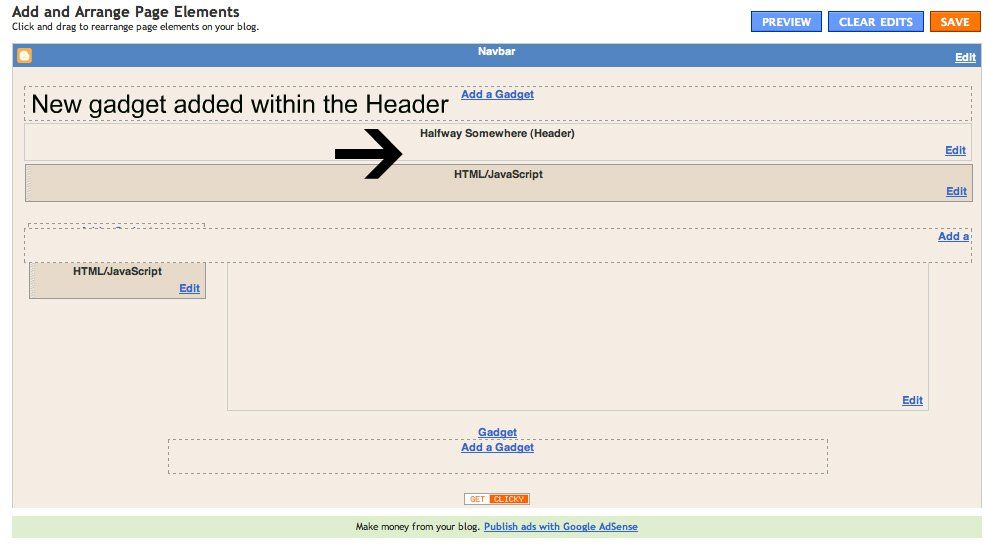
Step 3: Add an extra "Add a gadget" in the HTML for the blog Header. This involves the simple step of finding and editing showaddelement='no' to showaddelement='yes' in the template.
On my Mac I just do command-f to drop down the little search bar and type in "showaddelement" and it shows me where that text is on the page (not sure how to do that if you aren't using a mac/safari). You want to find the instance within the Header section and change that from 'no' to 'yes'.
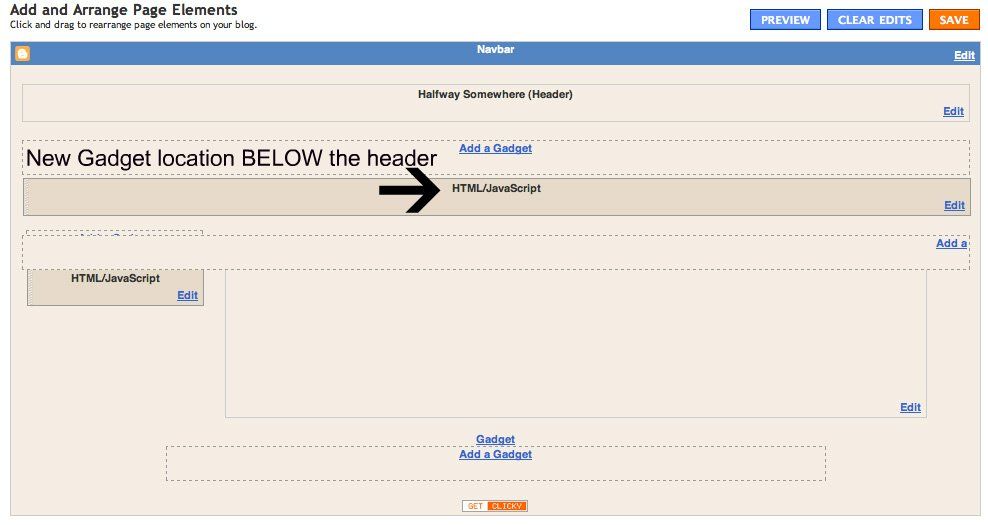
Step 2: Go to page elements, click ADD A GADGET in the blog Header section and choose an HTML/Javascript gadget. You can either have the gadget above or below your header, just drag it above or below and then drop it to place it (like how you would arrange your sidebar gadgets).
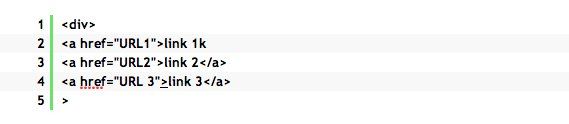
Step 4: Type in this HTML, with any number of links you wish:
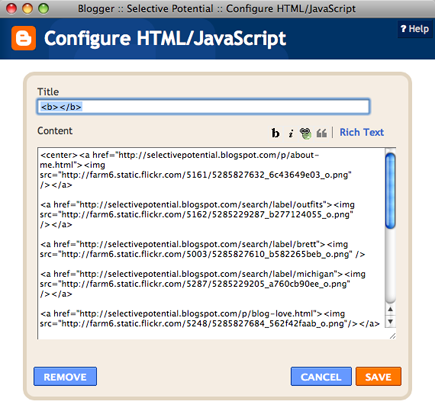
However, I've used images instead of text for my buttons. To do this, you'll need to create the images that your nav bar buttons are going to be, upload those to a photohosting site like flickr or photobucket, and then use this kind of code in your HTML gadget:
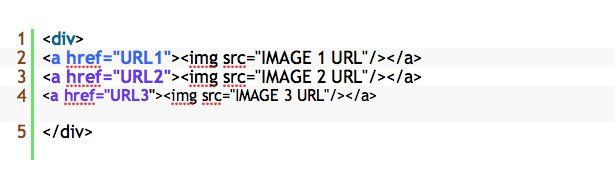
So instead of text, your buttons are images. I like this because it allows for greater customization than just the plain text links.
2. Adding a new place to "Add A Gadget" BELOW your header
This time instead of just adding an HTML widget to your header, we're actually creating a whole new location to add widgets to, below your header.
1. Go to Dashboard > Design > Edit HTML.
2. Back up your template.
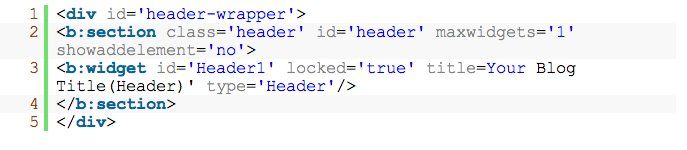
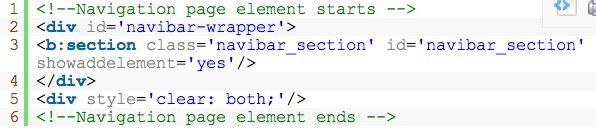
3. Look for the following lines (or something similar) in your HTML code:
Right under it, paste this code:
4. Now go back to "page elements" and you'll find a new place to add a gadget, right below your header. Click, "add a gadget," choose the HTML gadget and follow step 4 from the first example to add your links into the new Nav Bar!
If you're wondering how to link to all of your outfit posts, or all of your recipe posts, etc., you can do that using labels. You can label each post with a relevant label (there's a little box below the post as you're composing it where you can type in "labels for this post"), and then when you publish the post, right below it will be some hyperlinked text, like so:

If you click on one of those links, say "outfit", it will take you to a link that shows every post with that same label. In this case, it will show you all of my outfit posts: http://www.delightfully-tacky.com/search/label/outfit. So that's the URL I use for my "OUTFITS" button. It takes you to every post that I've labeled "outfit." My "BRAVE" nav bar button is the same kind of button, linking to all posts labeled "brave journey."
There you go! And remember: Always make sure to save a backup of your template before you start messing around with the HTML of your blog.
Tieka:
When I first started blogging, I used to have my navigation in my sidebar! I used images to link up pages and tags like, "About me", "outfits", etc. But once I decided I wanted to use my sidebar space more wisely, I decided to create a top navigation bar. It's great because it's so easy to find, it's the first place readers will look for buttons and it now is part of my design. You can have your navigation anywhere though (sidebar, top menu, bottom menu) just make sure that readers can find it easily.
For my tutorial, I use Blogger. In Wordpress, you'll have to create a menu system.
Using Blogger, in the "Design" tab, you can click to add a gadget. Be sure to select the HTML/Javascript gadget. Then, you can click and drag your gadgets around your blog. You can add it into the sidebars or you can drag it below the header. Once you have your HTML/Javascript gadget placed, let's dive into the HTML coding.
Use picture links to create a navigation bar!
What I do is create a picture link to link up all of my picture buttons to my links or tags. You can create your buttons using Photoshop or whatever program you use to edit your photos. Just make sure they are all the same height, otherwise your buttons will look all over the place. You can use images, text or little graphics for buttons - whatever you choose, just make sure that your buttons are clean and readable.
To create a picture link, use this HTML code:
You will have to figure out the links for your pages or posts and for your tags. To figure out the link of a page you created (like about me), click on the page and copy the web URL in your browser. You can do the same with your image address. Once you have your page/post/tag link and your image URL, you can insert them into the code. Wala, you've successfully linked up your button to your link!
Use the pages gadget in Blogger.
Another easy way of creating a top navigation bar in Blogger is to create a "Pages" gadget. You can go into your "Design" tab, click on "New gadget" and click on "Pages". This will only link up the pages you've created in Blogger though (like about me, contact, blog favorites). But it will not link up tags like (outfits, travel, friends, etc.). So if you are only looking to create a nav bar with your pages, then this gadget would be a good fit for you! But if you are looking to link up outfits or other "tags", you'll have to do a little bit of HTML work!
Some links you might find helpful:
