Showing posts with label blog design. Show all posts

Blog Design: Design is imperative


Blog Design: Is Imperative by Elizabeth, Delightfully Tacky & Tieka, Selective Potential

Elizabeth:
I would say that tantamount to good content is having a good layout. Let's face it, we are visual people and to add to that, we live in an era where information is given to us in a very visually designed way. Just look at how fancy the graphics are on news channels now! We have a hard time gathering information from sources that are poorly designed. So, that being said, I personally believe that if you want to grow your blog, it is a must to have a nice looking design.

If I go to a blog and the layout design is atrocious, it's unlikely I'll stay for longer than one page of it, and I'll probably never come back (unless the content is that good). I think having a nice looking blog is a testament to how much the author cares about his or her content. If you feel like you have good content, wouldn't you want your blog be a place where that good content is easily accessible and nice to look at? Reading a blog is like entering a cozy little corner of this giant house called the internet. A great looking blog can invite readers in and make them feel comfortable while they browse through your posts.

Here are a few benefits of having a great blog design:

1. Shows off your photos: Especially for those of us who post a lot of photos or outfit pictures, a good layout provides a nice canvas for those photos to be displayed on.

2. Easy to navigate: A good blog makes it easy for the reader to find the content their looking for. I've always made it a point to have links to my various types of posts (outfits/brave journey/food/travels). You can put this in your sidebar, or if you have a nav bar below your header, that's a great place to give people important links to stuff in your blog!

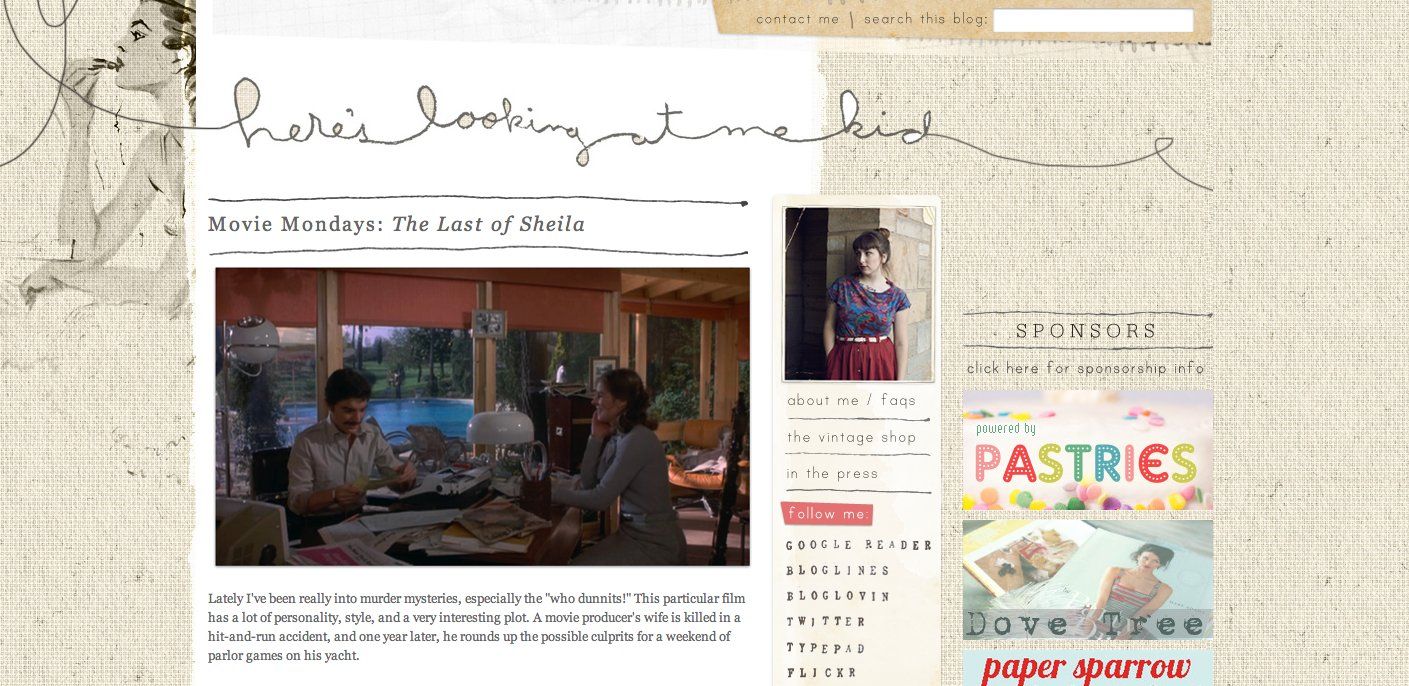
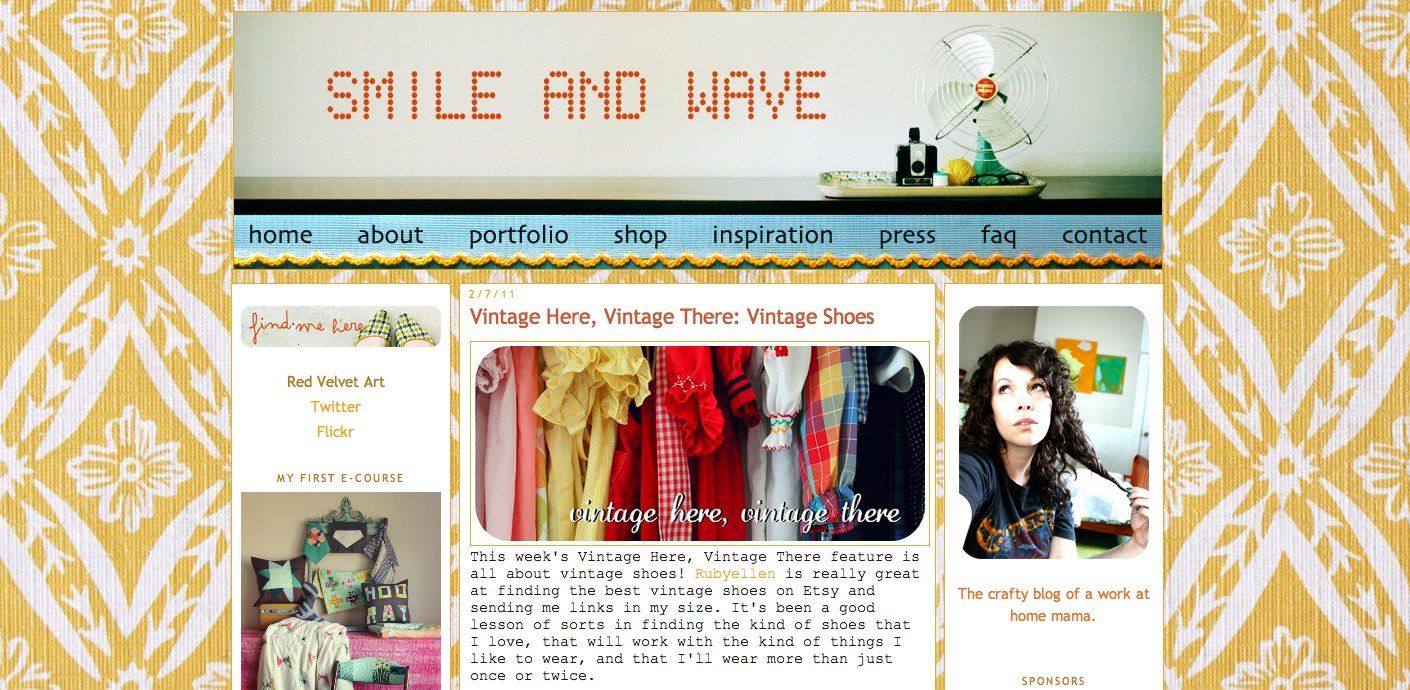
3. Identity: A good design gives people a sense of who you are and what your blog is about. Blogs with a focus on vintage might have more of a vintagey feel, like Rachel's blog Smile & Wave. A blog that is more into high fashion might have a more sleek look, like Le Blog De Betty.

4. Branding: A great blog design can be a part of your personal branding, which you can use for business cards and any other project that you put your name one. Your blog is essentially a tiny brand. Once you establish your branding, it can permeate your work. Use the same elements throughout your blog to solidify your branding. Pick a couple fonts and stick to using those two almost always. Pick a few colors that are essential to your branding, and use them when you add elements.

5. Consistency: I like to keep my blog looking essentially the same, even when I do tweaks to my layout. I like to keep my branding consistent. I know that some people like doing redesigns more often, but I really like a blog that I can go to and see the same design. You recognize it immediately.

Think about the blogs you love to visit and spend hours looking through. What is it about their design that you really love? Before tackling a redesign, think about the elements you'd like to include, what kind of vibe you want it to have, what your color scheme is going to be, and so on.

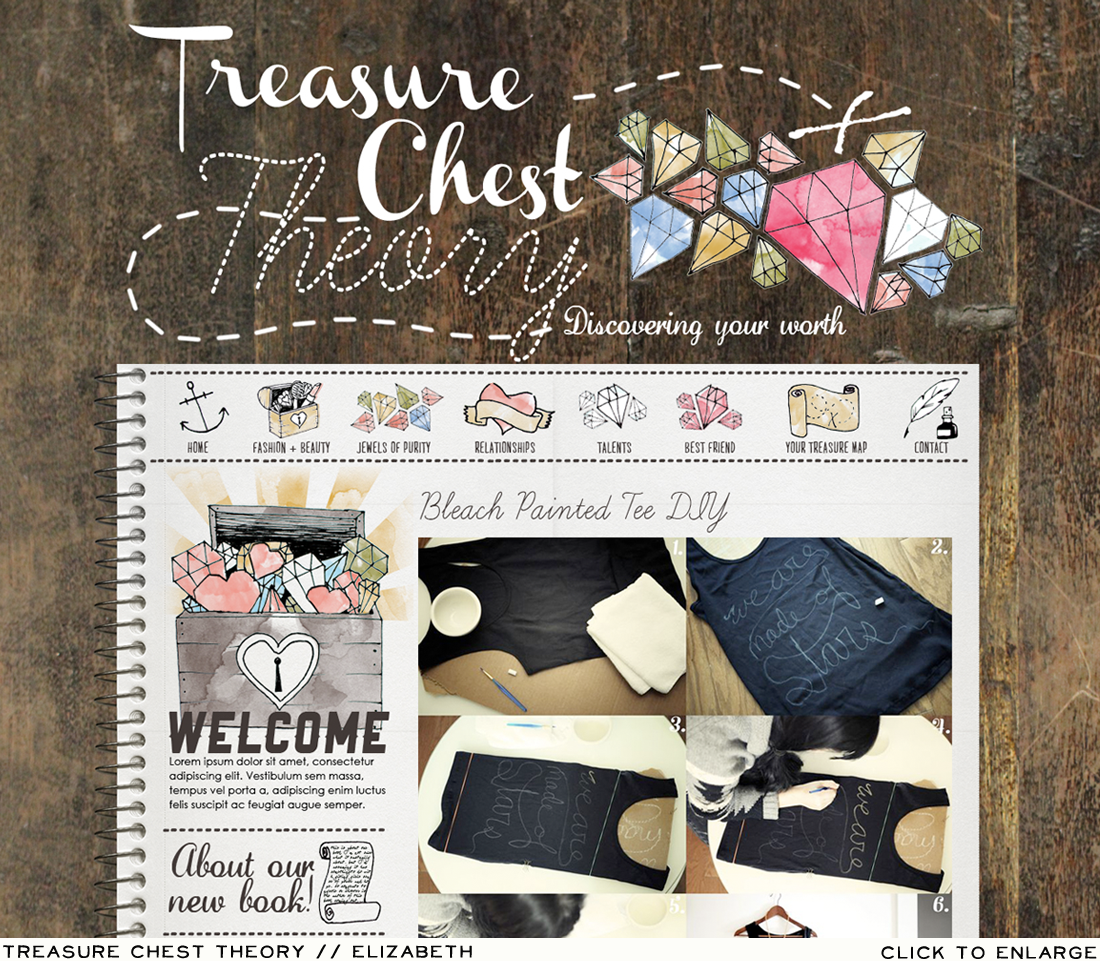
Working on your own blog design can be daunting, it still is for me at times! It's definitely not for everyone. If you don't have a lot of time to sit down and figure out all the HTML to do what you want, you can certainly consider hiring a designer to work on your blog for you! There are a lot of freelance designers out there looking for work. I know that Liz from SrslyLiz does blog designs, as does Kaelah from Little Chief Honey Bee. Usually if you find a blog design that you adore, you can either find on that person's blog a link to the designer, or the company they used to design it. Or, they may have designed it themselves and could have a link to their freelance design services! If they have none of those things, don't hesitate to ask who designed their blog!

I just started working for Freckled Nest blog design and I'm really thrilled about it! They do such great design work, so it'll be fun for me to be on an amazing team of designers! You can see their more on their packages here, and you can browse through all the different designers here to get a better idea of who might be the best fit to design your very own blog makeover!

Reader Question: What is important to put in my sidebars?

Tieka:

Your sidebars are a perfect area to create buttons, menus, widgets, archives, calendars, anything you feel is important or relevant to your blog. There are no rules to what you need in your sidebars (everybody is different) but here are some tips and ideas for keeping your sidebars usable... and relevant to your content.

1) Search. Search functionality is so important in a blog design. You can add a widget to create a search box, so readers can type in something... and pull up results based on your content.

2) Follow. It's super important to make sure you have a "follow" section in your sidebars. This needs to include RSS feed and Bloglovin'. If you use Blogspot, the "followers" widget is great to show who supports your blog and gives the reader an easy "follow" button so they can subscribe to your blog. If you prefer not to show your followers count, make sure you have an easy way that readers can follow via Google connect. You can also grab a Bloglovin widget right on their website and copy and paste into an HTML widget. Attention Wordpress users: There is no Wordpress equivalent of Google's friend connect. You can add a plugin for Wordpress to see your Google friend connect followers and add a button so readers can "follow" via Bloglovin, but there is no Wordpress follower system.

3) Quick bio/tagline. A quick little biography or tagline should be placed somewhere at the top or incorporated into your header. It's great for readers to see the blog and quickly read a sentence or two on what they are getting themselves into. In my little call out, I just write a quick hello to new readers. "Hello, my name is Tieka; residing in a small beach town in michigan with my amazing husband brett, I'm a graphic designer and blogger that loves personal style, marriage and adventures." Now, new readers know exactly what I'm about. Reference your themes in this section. So, for me, I basically just told them... you can expect to read about Michigan, my personal style, my marriage with Brett and the adventures we take together.

4) Social media. Your sidebars are a great idea to contain widgets for Twitter and Facebook. You can create the HTML code via Twitter or Facebook, or place a Twitter/Facebook widget. Social media is so powerful and so relevant to blogging. This gives readers an easy way to follow your tweets or "like" your Facebook page.

5) Online fashion communities. If you want to link up your fashion profiles to your blog, your sidebars are a great place. You can create new widgets for your favorite communities or you could create a simple text button that says, "Chictopia, Weardrobe, Lookbook, etc.". If you are looking to save on space, I would recommend a simple text link or button link.

6) Buttons. Having a place where readers can grab your "button" is a great way to self-promote! Plus, you'll feel so wonderful when you see your button on other blogs. It's a great way to support your favorites and a way for readers to support you! We'll show a tutorial soon on how to create your own grab button!

7) Archive. You don't need an archive on your blog, but if you want readers to easily be able to access old posts, this is the best way. My archive is one of my favorite things on my blog. It's my link to the past... and all of the amazing things that have happened in the past. I love to click open October from last year and see all of my titles "Picking pumpkins" "Field of colors"... and I'm instantly transported back to autumn. I love it. Plus, readers are so grateful to read my older posts if they want to reference something or learn more about my past.

I hope that helps with some of the essentials you need for your sidebars! You can also add so many more fun widgets. I temporarily add little polls, callouts for blogger meetups, a special feature I'm running, whatever. Make sure you are constantly evaluating your sidebars and keeping the content relevant and up to date. If something is outdated or not being used by readers, remove it. It's just taking up valuable space and your blog will take longer to load!


Pin It!

Blog Design: Do It Yourself


By Elizabeth, Delightfully Tacky and Tieka, Selective Potential

Elizabeth:

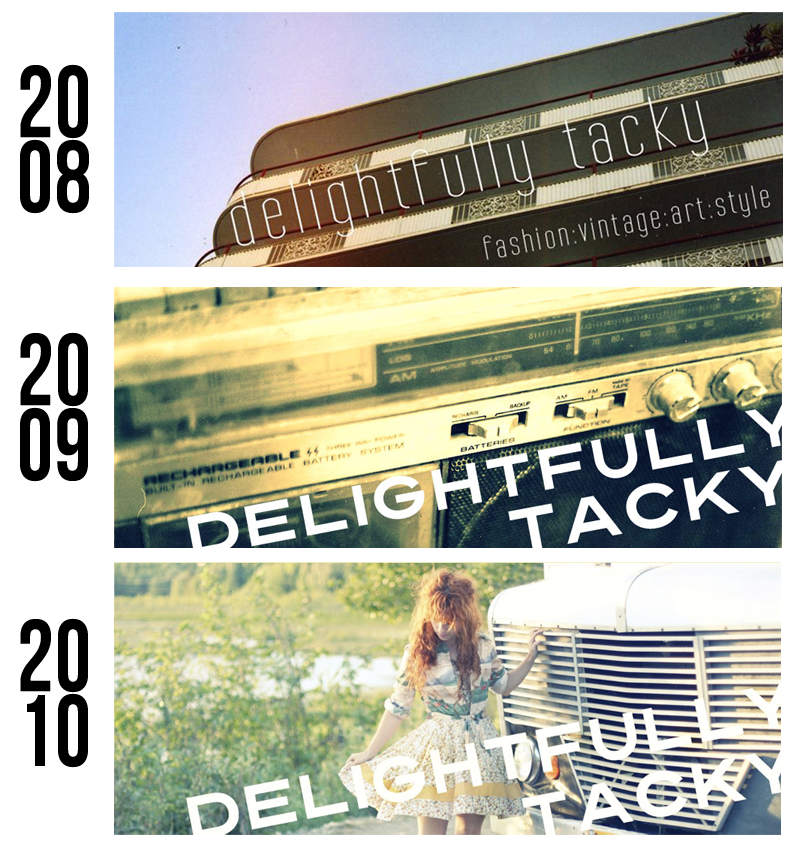
When I first started my blog, one of the first things I did was customize the look of my blog. This probably has to do with the fact that I adore designing everything in my life: my apartment, my business cards, my notebooks, my Winne, and so on. I like making my surroundings reflect who I am, and a blog is definitely a reflection of who you are! I found my first template on some site by googling "Vintage blogger templates". The background I have today is almost the same as the background I had, I've tweaked it a bit here and there, but it's largely the same! One of the first and easiest things you can do to customize your template, is make your own header. It's one of the first things that people notice and it's right there at the top of every page, so make sure to have a great, visually grabbing header. Here are my headers from the past:


And now I have a brand new header on my blog featuring a little drawing of the Brave! As I learned more about blogging, I got more ambitious and wanted to add more elements to my design. I've always done all the design work on my own blog and I started blogging with no knowledge of HTML whatsoever, so you can definitely DIY your own blog design, just know that it takes a lot of research and time to get to know how to do it! I moved from a 2 column design to 3, added a nav bar, figured out how to make big photos and a custom post title font, and widened my whole layout all by Googling and finding tutorials online.

Here are some tips that you can use to work on your own blog template:

1. Always always always always always (get the picture?) always make a copy of your whole blog template HTML and save it to a document file on your computer. That way if you ever completely mess things up, you always can restore your template to where it was before you started messing with things. Otherwise you could spend hours trying to work on your blog, screw up along the line and have to start over from scratch! It's a sickening feeling. Whenever I do some serious work on my blog HTML template, I save a back up to my computer.

2. Google is your friend. In fact, Google is more than your friend, Google is an invaluable resource. Everything, and I mean everything, I've ever tried to do on my blog layout, or even just figuring out little stuff like how to make a hyperlink go to an email address, was learned by Googling it. If you don't find what you want the first time you search, try tweaking the wording or only using the most important words in your search.

3. Set aside a good chunk of time to do your HTML work. All my template projects have kind of been on a whim but luckily I've had enough time each time I do something with HTML. I don't know about you guys, but figuring out how to tweak stuff with HTML requires a lot of brain power and focus for me, so I like to have a good amount of time I can focus on just the task at hand. Sometimes I've spent hours working on figuring out one little thing, but the feeling of accomplishment when I finally complete my work is so great!

Tieka:

Blog design is something that is so important to me. It's where you can quickly capture a reader, identify who you are... and do it all without saying a word. Plus, I graduated from college with a degree in digital media/graphic design, so blog design is an obvious interest for me. It's something that draws me in quickly to a blog. I love unique, easy-to-navigate blog designs that load quickly and serve a purpose! I also love when a blog design ties directly to the bloggers theme. In the next session, I'll be talking about how you can incorporate your theme into your blog design.

When I first started my blog, I started right away on teaching myself HTML. I found a website full of free blogger templates (Blogger Templates) and uploaded one to my blog. (Ps; I'll be showing you how to do this in a tutorial on HTML day!) and quickly started customizing. I customized my layout so much that it didn't even look like the template I uploaded anymore! I did this all by using Google. Google will be your best friend while learning HTML and blog DIY tips and tricks.

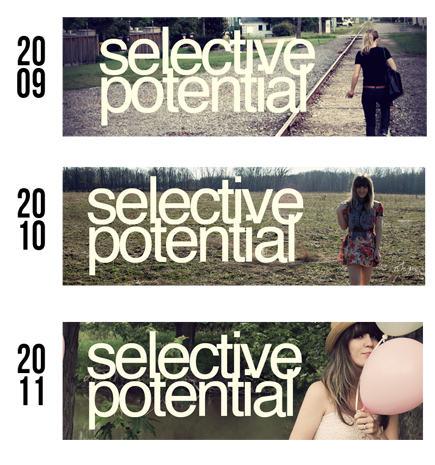
These are my headers I've used since I've started blogging. When I first started my style blog, Brett and I took so many photos on these railroads tracks... they almost came to define me! I still love going back there for posts! I may have changed my images, but I've never changed my logo, since it's an important part of my identity. I also only use images I'm very proud of... and directly represent my style or blog. If you are using an image in your header, make sure it has major importance to your blog. It's the first thing readers will see!

The biggest elements of your blog design will be:

1) Header
2) Background
3) Color scheme (Kuler is AMAZING to help you with a color scheme!)
4) Fonts

Be sure that each of those elements reflect the themes you've chosen for your blog and reflect your personality. Like mentioned, if you can't think of a design for your themes... think about other things in your life that have meaning. Think of your surroundings, what makes you happy, a favorite color. Having a well-designed blog is the best way to say who you are... without actually saying a word! You want to appear professional and organized, so make sure your blog is saying the same about you.

Great websites for help on DIY blog design:


Pin It!

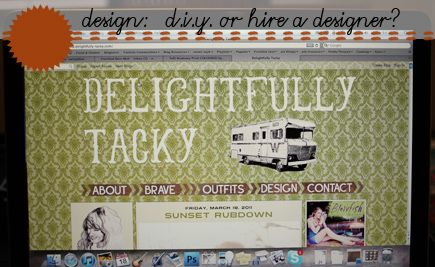
Blog Design: DIY or Hire a Designer?


by Elizabeth, Delightfully Tacky

There are different routes to go when it comes to your blog design. You can do your design yourself, hire someone or a company to design your blog, partially design your blog and have someone else design specific parts (like your header or background), or you can find a pre-made template online. A lot of your decision depends on both your ability to design your blog yourself, your commitment to searching for online tutorials on HTML, or your financial ability to hire an expert to do your design and formatting for you.


I currently design blogs for Freckled Nest Design, and I have also used a blog template and designed my own blog by figuring out stuff using online HTML tutorials, so I've been involved in many of the options available. The first thing I did when I started my blog was start customizing it. I googled something like "vintage blogger layout" and found something that looked good and uploaded it. After that I pretty much tweaked it endlessly using HTML tutorials online until it became what it is today. Figuring out HTML and doing your own blog formatting & design takes a lot of time and work, sometimes frustrating. So, while doing your own design work is cost effective, it can also be extremely frustrating and time consuming.


Another option is to hire someone to design your blog. This is a great alternative for someone who doesn't necessarily have an eye for design and doesn't have the time to spend trying to figure out the behind the scenes HTML to make a design come to life. It is an investment, however, so if you don't have the money to spend on having your whole entire blog made over, consider the option of getting just a few items designed for you. You can give your blog a mini facelift by having a designer give you a custom header or a fresh background at a cost that's considerably lower than having a designer do your full blog layout.

If you have the time, energy and a good eye for design I would say go for trying out your own blog design! If not, take a look at some designers and find one that you think would fit your needs!

Pin It!

Blog Design: Adding Theme


Blog Design: Adding Theme by Tieka, Selective Potential

One of my favorite things about a blog design is when bloggers incorporate their themes into their design. It's all apart of including you in your design. As you all know, blog design is the first thing we notice when we click on a blog. We are instantly connected to the blogger... all in the images, colors and fonts they use. For my blog, I had a difficult time thinking of incorporating my themes into a blog design. My themes are personal style, love and adventures... so what kind of design went with that? So instead I started looking to other aspects of my life that could influence my design. We live in a small quaint beach town, so I knew I wanted to incorporate a beachy color pallet. I also love bold, strong, clean logos, and Helvetica is such a big part of typography (my favorite subject in college!) so I went with that for my header. I also wanted to include a more down-to-earth, girl next door feeling, so I included a handwritten font. You have to put thought behind every element of your blog design. Every detail counts!

Think about your themes. Think about what makes you you. Here are some great examples of blog designs that incorporate the blogger's theme and personality.


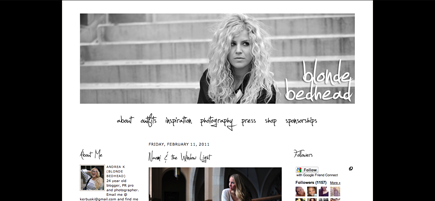
1. Andrea of Blonde Bedhead

Andrea has a personal style blog that is very urban. She wears a lot of black and white, leather, studs and loves taking her outfit pictures in a city style setting. I designed Andrea's blog for her... and I took into consideration everything that makes her unique. She's also a great photographer, so we knew we wanted a powerful image for her header. With the urban font, the bold header and the black and white color scheme... we had Andrea herself reflected perfectly in her blog design.


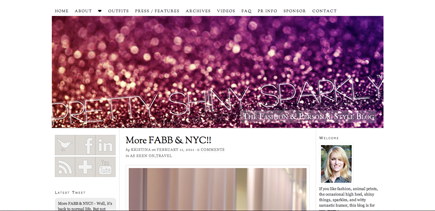
2. Kristina of Pretty Shiny Sparkly

Kristina does a great job of incorporating her theme and blog into her layout. Her layout is clean, crisp, easy to navigate and entices you right away with a great header that reflects her. Her blog is all about things pretty, shiny and sparkly. So she incorporates a glittery image for her header, a pretty girly pink and purple color scheme and uses these elements in many aspects of her blog design.


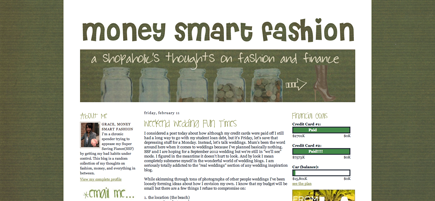
When I worked with Grace on her blog design, I made sure to get every detail on what her blog was about before we started. Since her blog is about personal style, being smart with finances and accomplishing financial goals... we wanted to directly reflect that in her design. We went with a "money" green color scheme to start. Since her blog is about finances, but it's still about fashion, we used a girly header font so the design didn't seem too strict or "responsible". We also wanted to find a way to reflect accomplishing financial goals, so we took the header idea of saving money to reap stylish rewards. We also used her "tagline" right in her header. Everything her blog is about is directly accomplished in just one quick look at her blog design.


I hope this session helps you define what your blog design should be like! Now that you have a better understanding of your content and your themes... it should be easier to think of a blog design. If your themes are generic (like growing up, going to college, personal style) you'll have to get creative. Think of your college... maybe you could take color inspiration, font inspiration. Think about where you live and your surroundings. Use your favorite colors. Think of a favorite food and use it as an element in your design (cupcakes, cookies). Think of everything you love. Something could trigger a great design that totally reflects you!


Pin It!

Blog Design: Branding


by Elizabeth, Delightfully Tacky

Your blog design has a lot to do with your personal branding. You want your design to immediately communicate who you are and make a statement. Think about actual brands and how they've done this. There are things like colors, fonts, design elements, photography and more to consider. Consider that you aren't necessarily branding a company, but it's more accurate that you're branding yourself. I kind of consider Delightfully Tacky and myself to be one and the same. I am Delightfully Tacky, essentially.  Especially as a personal style blogger, your blog and your brand is mostly about yourself, so you want to be really intentional about how you go about presenting your "brand."

One important step to defining your branding is determining what kind of blogger you are and what sort of vibe you have. Some bloggers are more edgy and modern, others are more vintage inspired. What kind of image are you looking to present? Are you really high-fashion and edgy? Do you love bright colors and graphic, bold colors? Are you more into retro prints or scrapbook-inspired layouts? Really take some time to evaluate how to represent your brand. Once you do this, you can move forward with designing your layout and creating a branding that encompasses your web presence. This can even go as far as affecting how you edit your photographs!

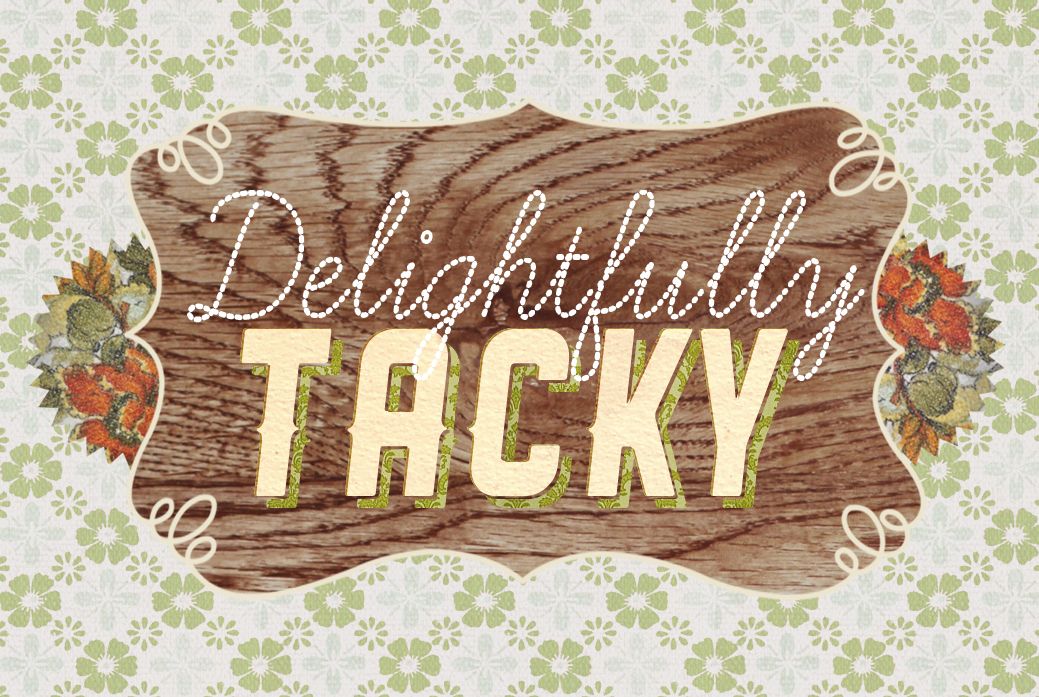
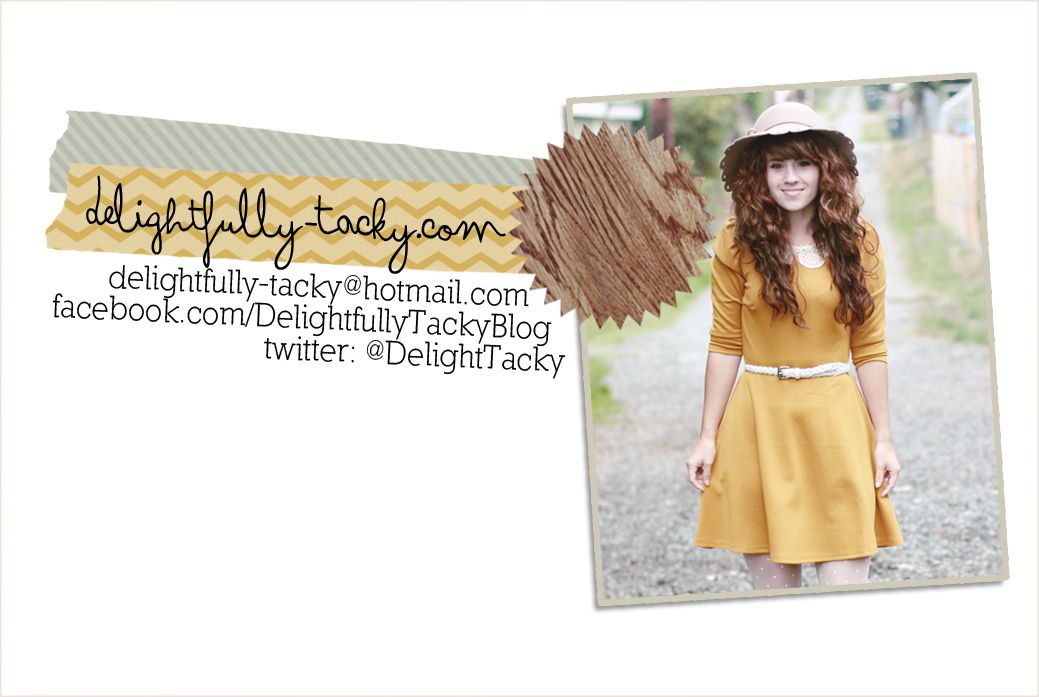
A lot of my branding has centered around woodgrain and the background design of my blog. You can see how I've taken my blog design and translated it into business cards:


It includes both the wood grain and background image elements. I feel like it instantly communicates a lot about Delightfully Tacky, and anyone who knows my blog, can see that it ties back to the web site seamlessly. On the back I have all my contact info, and a photo of myself, which is pretty handy when you're handing your card out to a ton of people at conferences and meet-ups.  It's hard to tie a face to the business card/blog, so this helps the recipient of the card remember who you were!

Here are some things to think about when you're branding yourself/your blog:

1. What are your favorite colors?
Create a palette of 3 to 4 colors that compliment eachother which you'd like to be your main colors. You're gonna want to choose a color palate that you both like and something that works well in a design.

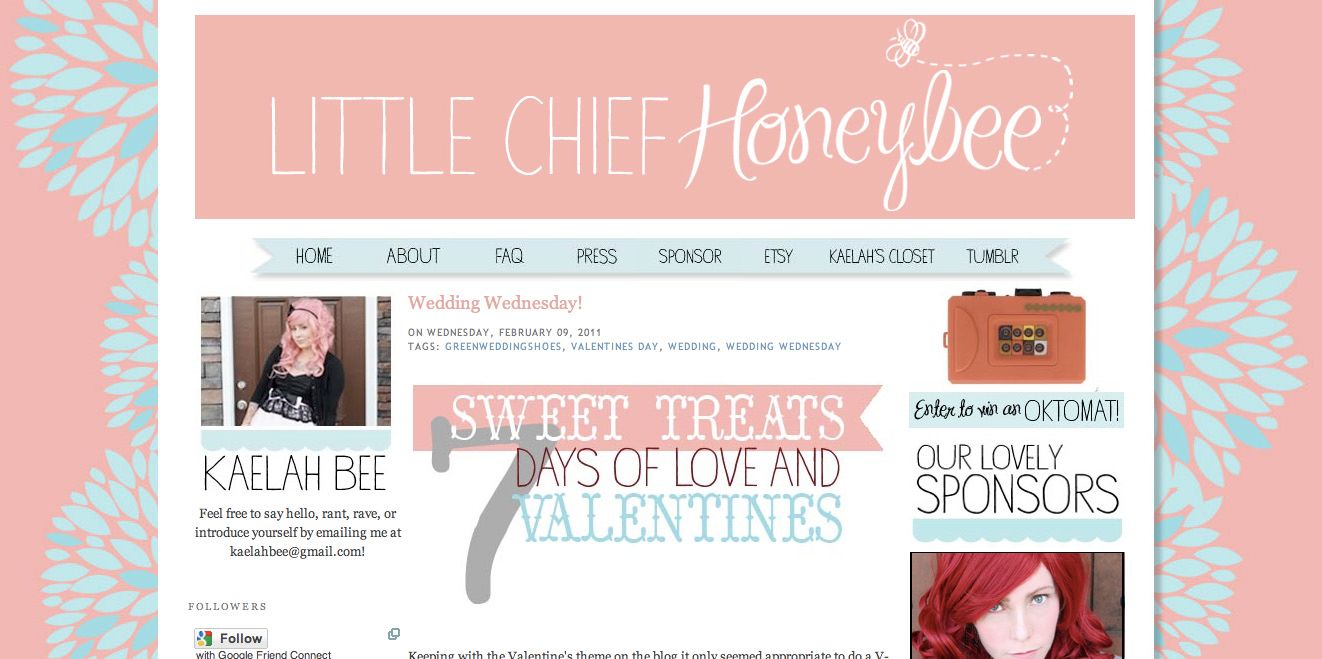
I chose more vintage 70's colors, but if you look at Tieka's blog, you see that she uses more neutrals. Some people enjoy a more light, pastel color palate, while others like bold, bright primary or neon colors. Whether it be jewel tones, or monochrome, choose a color palate that works in your favor. It's a good idea to limit the number of colors to no more than 5, just so the color story doesn't get muddled or too busy. Kaelah has basically three colors in her branding: pink, light blue and white. You can see how visually striking her design is and how it immediately communicates her branding.


2. What kind of fonts do you like?

Are you more into sans serif, clean and modern fonts, or more handwritten fonts? I'm kind of a typography nerd, so I always love a good font and I believe that they are crucial for branding. There are so many free font sites out there for you to pick a nice font for your blog (one that I use regularly is dafont.com). There's no reason for anyone to be using Curlz MT, Papyrus, or Comic Sans. Pick a main font, and then have one or two accent fonts. Tieka has Helvetica as her main font in her header, and then she uses the cute handwritten font for her post titles and stuff like that.


3. Can you define your blog's visual theme? Are you more into minimalism, or do you like patterns and more eclectic designs?

Since I like tacky 70's-ish things, I instantly gravitate towards gaudy 70's patterns and faux wood, which is why I chose those two elements to represent my brand. I really love how things in the 70's were kind of a little over the top, a little gaudy, and really kitschy. That's pretty much my jumping off point. You have to think of yours. What kind of environment describes you best, how do you want to communicate that to your readers? Do you want lots of texture? Do you want something give off a scrapbook/DIY vibe? Vintage, and if so, what era? Look at how Mandi has made her theme very textural and natural. There are layers of paper and handwritten elements. Notice how her theme is very different from Kaelah's but they both are extremely effective in communicating their respective brands.

4. Do you have a blog name yet?

If so, does it accurately sum up you and your brand? Does it quickly give your readers an idea of who you are? If you don't have a blog name yet, make sure you really consider how you want to be known. 

Your blog name is very much a representation of your brand. Think about how when you hear the word "Starbucks" so many images and thoughts pop into your head. When someone says your blog name, it should be the same (though on a micro-scale). I mean, so many people out there who read my blog know me as Delightfully Tacky, not as Elizabeth. So I would hope that my blog name communicates to them something about who I am, what my "brand" is all about, and what they should expect to see from my brand. Some great blog names are: A Beautiful Mess, The Clothes Horse, and The Coveted.

5. What sentence sums up your brand?

Think of a catchphrase or headline that would define your blog. As my high school english teacher would say, it should be short, sweet & to the point. Kyla's headline is "Daydreams from a handmade prairie life", Rachel's is "Vintage, Home Decor, and Big Messes", Julie's is "big hair, small wallet". As you can see, you get a pretty good idea what to expect from each person's blog based on that quick snippet. It's not totally necessary to have a sentence like that posted on your blog or in your headline, but it's a good idea to think of how you'd describe your blog in a quick, short sentence. It'll help you define the focus of your blog and be able to communicate that to others.

Remember that design elements should be used simply and in moderation. Don't try to mash together more than one theme, don't use a bajillion fonts or colors. You don't want your brand to be muddied with all these stories you're trying to tell. Figure out what you want to say, and then create a visual plan of action to simply, accurately, and effectively communicate that.


Pin It!

HTML: Navigation bar


by Elizabeth, Delightfully Tacky and Tieka, Selective Potential

Having a navigation bar on your blog is really important. It allows your readers to quickly and easily access your most pertinent information and content. You don't want to make your readers spend more than a few seconds looking for a link to something important on your blog. How easy a website is to navigate often shows how well designed it is. Make your information easy to locate for your readers! There are several ways to create a navigation bar, so follow along for a couple of tutorials.

Elizabeth:
Right now on my blog, my nav bar has links to my About/FAQ page, all my Winnebago Journey posts, all my outfit posts, and my contact information. I'll probably be adding another one soon linking to my blog designer profile, so that people interested in having me makeover their blog design can easily find that information as well.

(This session is going to tell you how to do it in Blogger. If you have Wordpress or another platform, I have no clue how you'd go about doing it. But I will say that in pretty much all cases, when it comes to figuring out HTML, Googling it is your best bet.)

Here are two ways to go about putting a horizontal navigation bar on your blog:

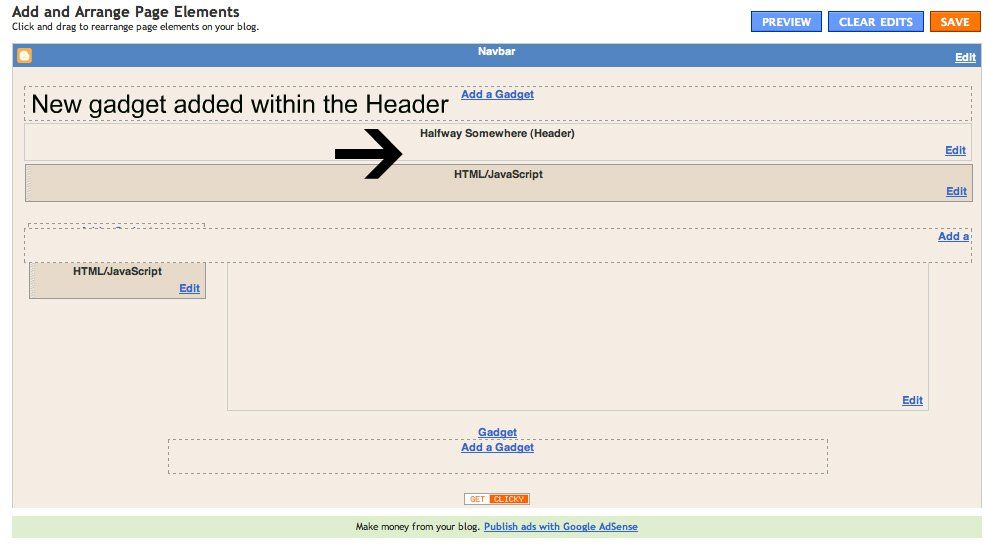
1. Adding a place to "add a gadget" TO your header

Step 1: Go to Dashboard > Design > Edit HTML.

Step 2: Back up your template.

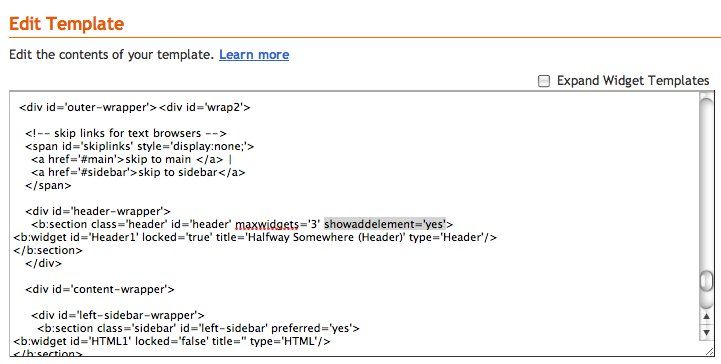
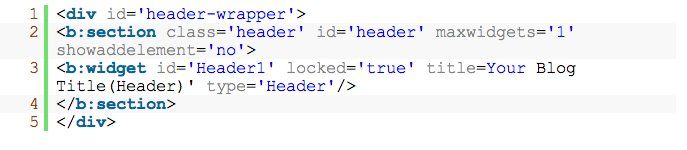
Step 3: Add an extra "Add a gadget" in the HTML for the blog Header. This involves the simple step of finding and editing showaddelement='no' to showaddelement='yes' in the template.

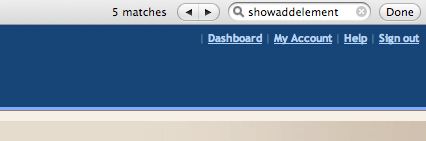
On my Mac I just do command-f to drop down the little search bar and type in "showaddelement" and it shows me where that text is on the page (not sure how to do that if you aren't using a mac/safari). You want to find the instance within the Header section and change that from 'no' to 'yes'.


Step 2: Go to page elements, click ADD A GADGET in the blog Header section and choose an HTML/Javascript gadget. You can either have the gadget above or below your header, just drag it above or below and then drop it to place it (like how you would arrange your sidebar gadgets).


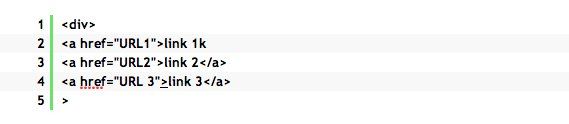
Step 4: Type in this HTML, with any number of links you wish:
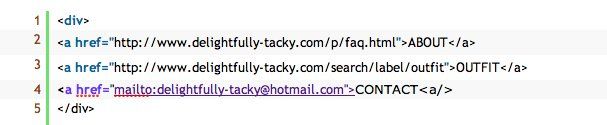
where you should change the URL and the "Link 1" to any text that describe the page you want to link to like HOME, ABOUT US, etc. For example:


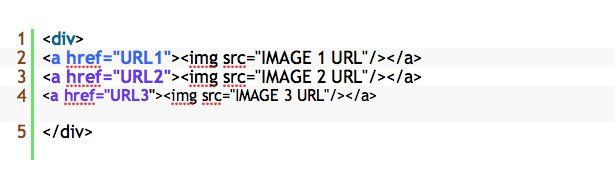
However, I've used images instead of text for my buttons. To do this, you'll need to create the images that your nav bar buttons are going to be, upload those to a photohosting site like flickr or photobucket, and then use this kind of code in your HTML gadget:


So instead of text, your buttons are images. I like this because it allows for greater customization than just the plain text links.


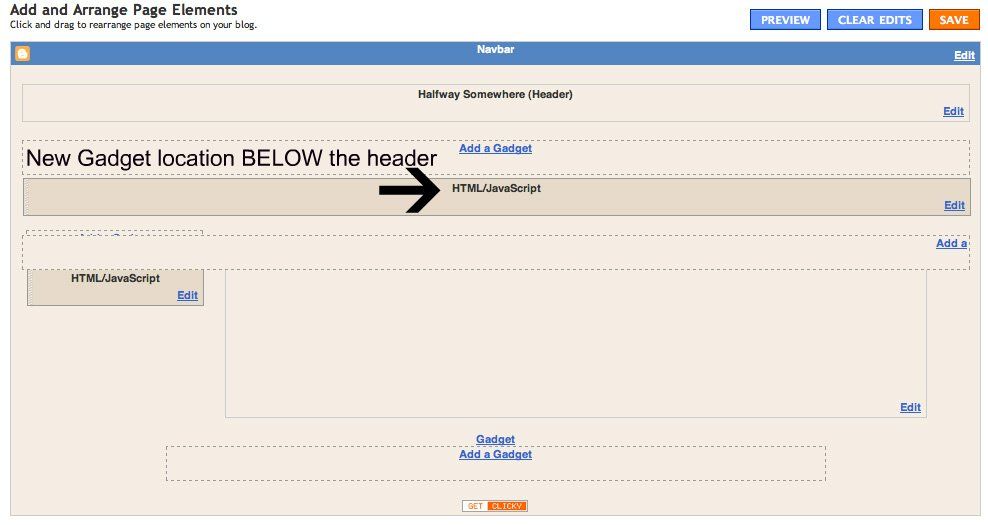
2. Adding a new place to "Add A Gadget" BELOW your header

This time instead of just adding an HTML widget to your header, we're actually creating a whole new location to add widgets to, below your header.

1. Go to Dashboard > Design > Edit HTML.

2. Back up your template.

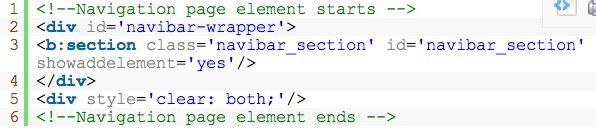
3. Look for the following lines (or something similar) in your HTML code:


Right under it, paste this code:


4. Now go back to "page elements" and you'll find a new place to add a gadget, right below your header. Click, "add a gadget," choose the HTML gadget and follow step 4 from the first example to add your links into the new Nav Bar!


If you're wondering how to link to all of your outfit posts, or all of your recipe posts, etc., you can do that using labels. You can label each post with a relevant label (there's a little box below the post as you're composing it where you can type in "labels for this post"), and then when you publish the post, right below it will be some hyperlinked text, like so:


If you click on one of those links, say "outfit", it will take you to a link that shows every post with that same label. In this case, it will show you all of my outfit posts: http://www.delightfully-tacky.com/search/label/outfit. So that's the URL I use for my "OUTFITS" button. It takes you to every post that I've labeled "outfit." My "BRAVE" nav bar button is the same kind of button, linking to all posts labeled "brave journey."

There you go! And remember: Always make sure to save a backup of your template before you start messing around with the HTML of your blog.

Tieka:

When I first started blogging, I used to have my navigation in my sidebar! I used images to link up pages and tags like, "About me", "outfits", etc. But once I decided I wanted to use my sidebar space more wisely, I decided to create a top navigation bar. It's great because it's so easy to find, it's the first place readers will look for buttons and it now is part of my design. You can have your navigation anywhere though (sidebar, top menu, bottom menu) just make sure that readers can find it easily.

For my tutorial, I use Blogger. In Wordpress, you'll have to create a menu system.

Using Blogger, in the "Design" tab, you can click to add a gadget. Be sure to select the HTML/Javascript gadget. Then, you can click and drag your gadgets around your blog. You can add it into the sidebars or you can drag it below the header. Once you have your HTML/Javascript gadget placed, let's dive into the HTML coding.

Use picture links to create a navigation bar!

What I do is create a picture link to link up all of my picture buttons to my links or tags. You can create your buttons using Photoshop or whatever program you use to edit your photos. Just make sure they are all the same height, otherwise your buttons will look all over the place. You can use images, text or little graphics for buttons - whatever you choose, just make sure that your buttons are clean and readable.

To create a picture link, use this HTML code:


You will have to figure out the links for your pages or posts and for your tags. To figure out the link of a page you created (like about me), click on the page and copy the web URL in your browser. You can do the same with your image address. Once you have your page/post/tag link and your image URL, you can insert them into the code. Wala, you've successfully linked up your button to your link!


Use the pages gadget in Blogger.

Another easy way of creating a top navigation bar in Blogger is to create a "Pages" gadget. You can go into your "Design" tab, click on "New gadget" and click on "Pages". This will only link up the pages you've created in Blogger though (like about me, contact, blog favorites). But it will not link up tags like (outfits, travel, friends, etc.). So if you are only looking to create a nav bar with your pages, then this gadget would be a good fit for you! But if you are looking to link up outfits or other "tags", you'll have to do a little bit of HTML work!


Pin It!

HTML: Adding sponsor spots & buttons


by Elizabeth, Delightfully Tacky

One thing you may want to know (if you don't already) is how to create buttons in your sidebar. What you're basically doing is just making an image clickable by adding a click-through link to the HTML code when you put the image in your sidebar. I'll be showing you how to do this in Blogger but the process should be similar in other platforms.

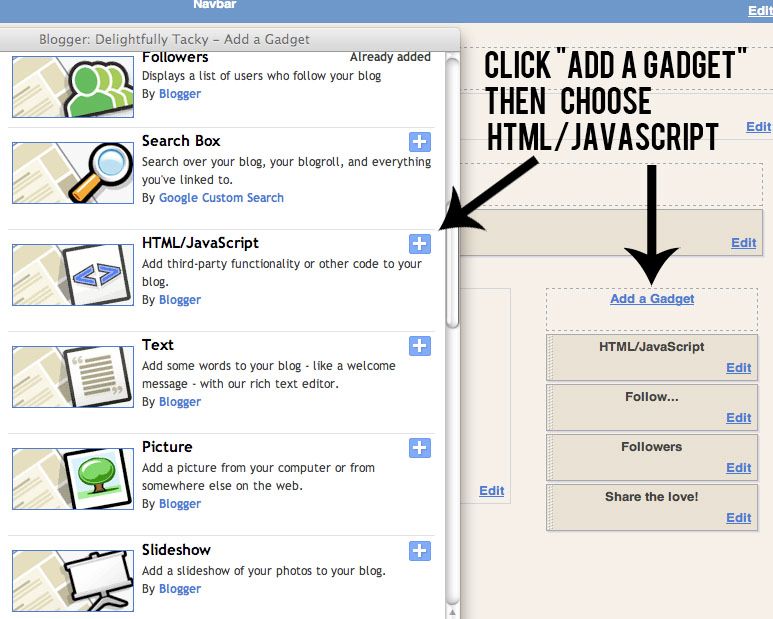
First, you'll need to add a new gadget in your sidebar. Click "add a gadget" and then choose "HTML/Javascript from the options available in the pop-up window.


Now you have a new gadget where you can put anything you want! We're going to insert a linked image, which can function as a link to something in your own blog (like your outfit posts, about me, etc.) or they can be sponsor ads!
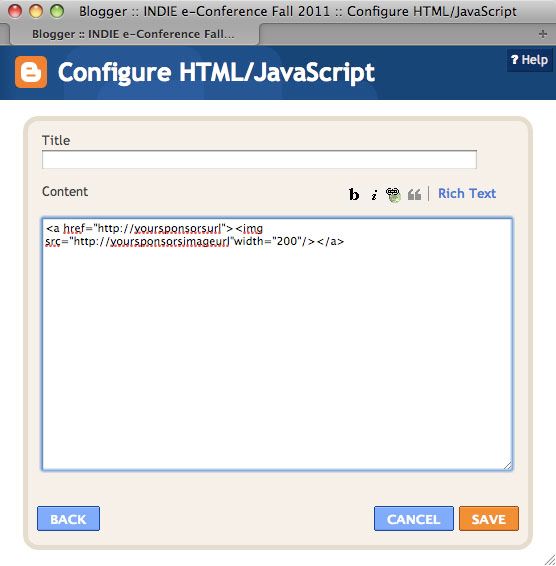
Use the HTML tags we learned earlier today to make a link and image that will click through to the link, like so:


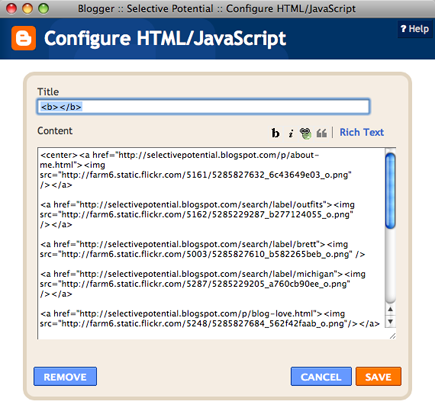
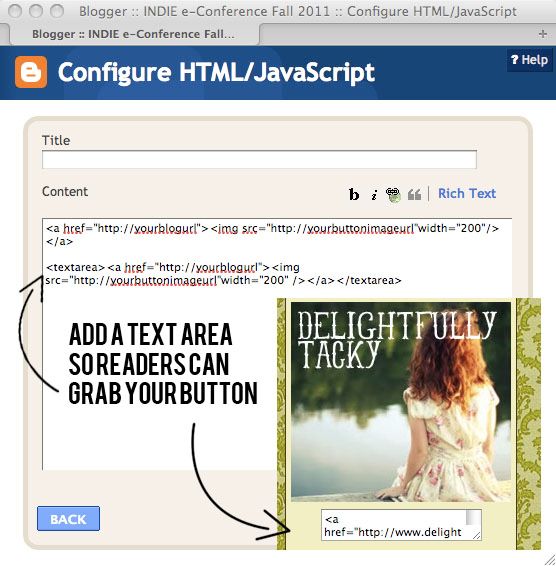
And then if you want to create a little text box underneath the photo so people can grab it and put it into their sidebar too, add the textarea code underneath with the code you want within the text box for people to grab, like so:


Here's what that looks like in the widget creator:


For all this, you'll want to know how wide your sidebars are, so you don't end up trying to put a 400px image in a 200px sidebar. The image will end up spilling over the edge of your sidebar and will look weird. You can either edit the image to be the exact width of your sidebar or you can add: width="220"  (inserting the width of your sidebar there, mine are 220px) and it'll make your photo that width.

If you're making buttons for readers to grab, you also might want to give some instructions on how they can place them in their sidebar, for those readers who aren't sure. On my blog I have written, "To put in your blog, just copy the code below and paste into an HTML widget in your blog!"

Do you have any buttons on your blog? Try it out! It's pretty fun!

Pin It!